Introduction
In this article, I will guide you through the process of creating a Payoneer account in 2024 and securing a $50 bonus reward as a new customer from Payoneer. This bonus is available when you successfully complete your first $1000 in transactions on marketplaces such as Fiverr, Upwork, Amazon, or Shopify. The account creation process involves four simple steps.
Payoneer is a financial services company that provides online money transfer and digital payment services. It offers cross-border payment solutions for businesses, freelancers, and professionals. Payoneer facilitates transactions in multiple currencies and allows users to receive funds from international clients, marketplaces, and platforms. Users can then withdraw these funds to their local bank accounts or use Payoneer’s prepaid Mastercard for spending.
To initiate this process, please carefully follow all the steps outlined below:
- Begin the signup process by clicking either on the link provided here or the button below labeled “Signup and Get $50 Bonus Reward.“
- Upon clicking the button, the following landing page will appear on your screen. Navigate to the “Signup and Get $50” option and click on it to proceed.
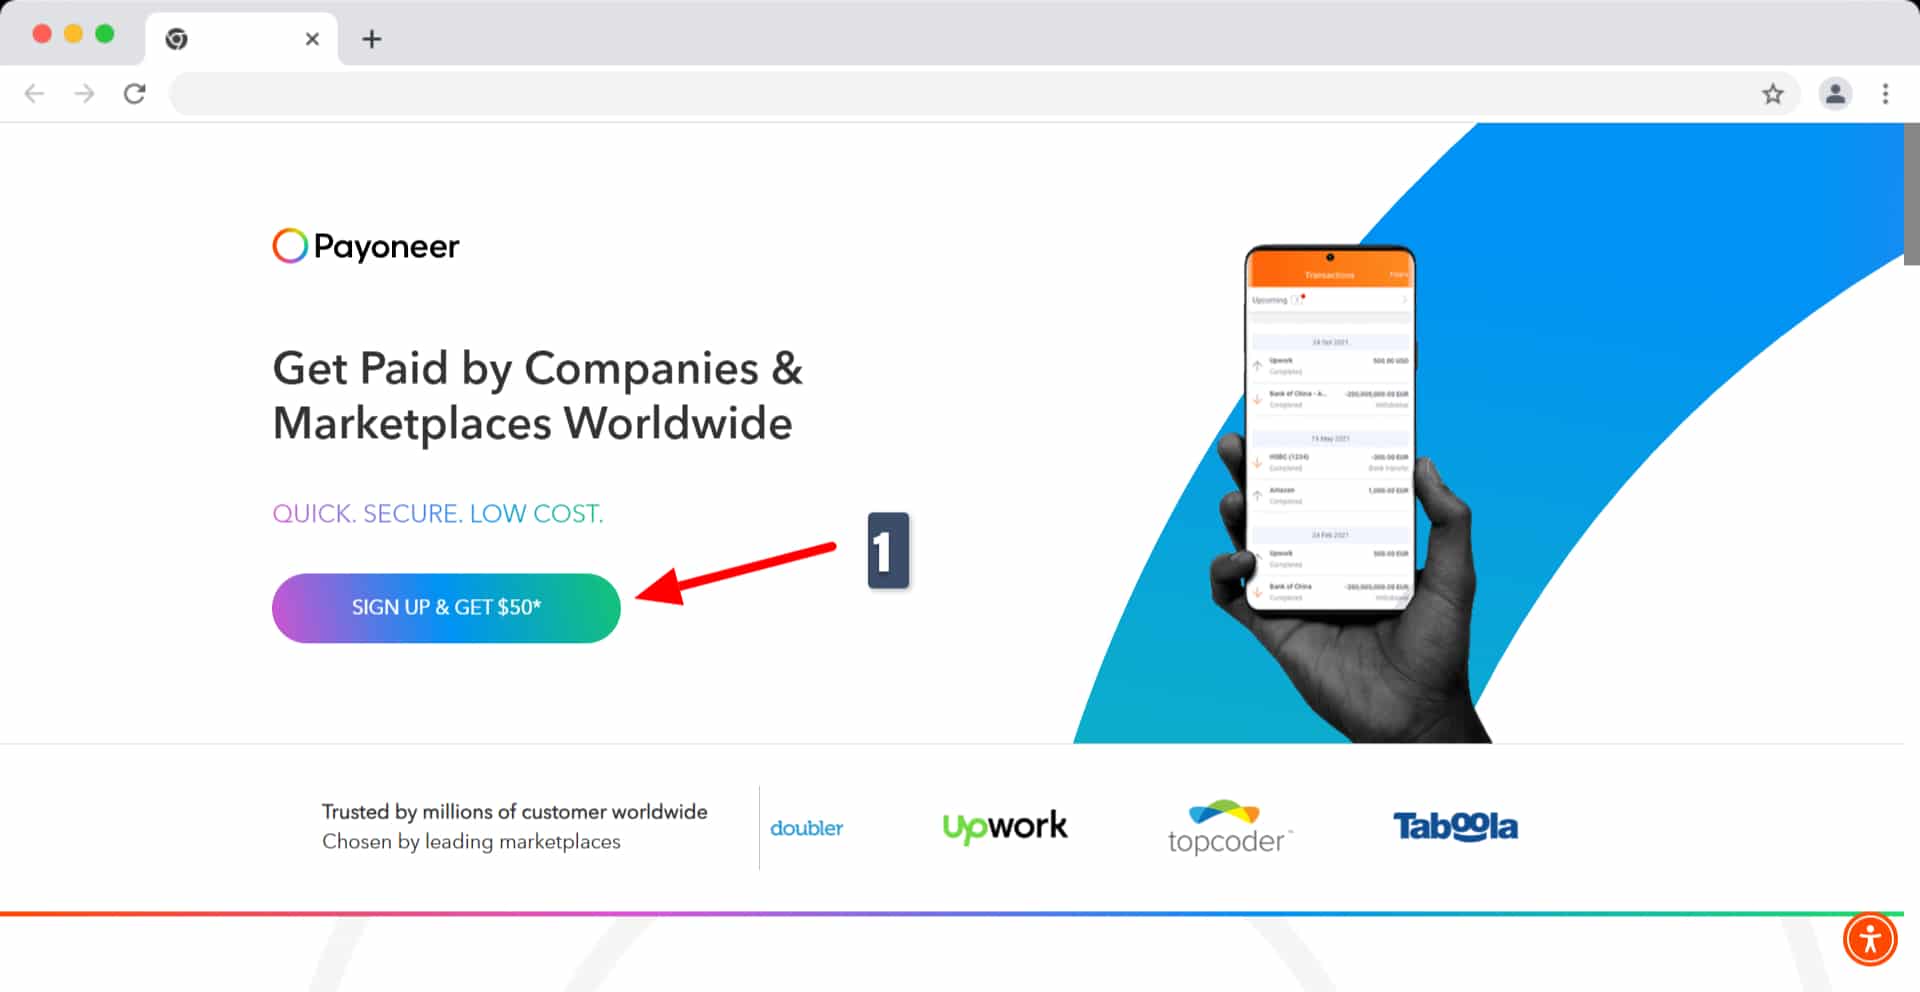
STEP 1: ENTER YOUR PERSONAL INFORMATION HERE
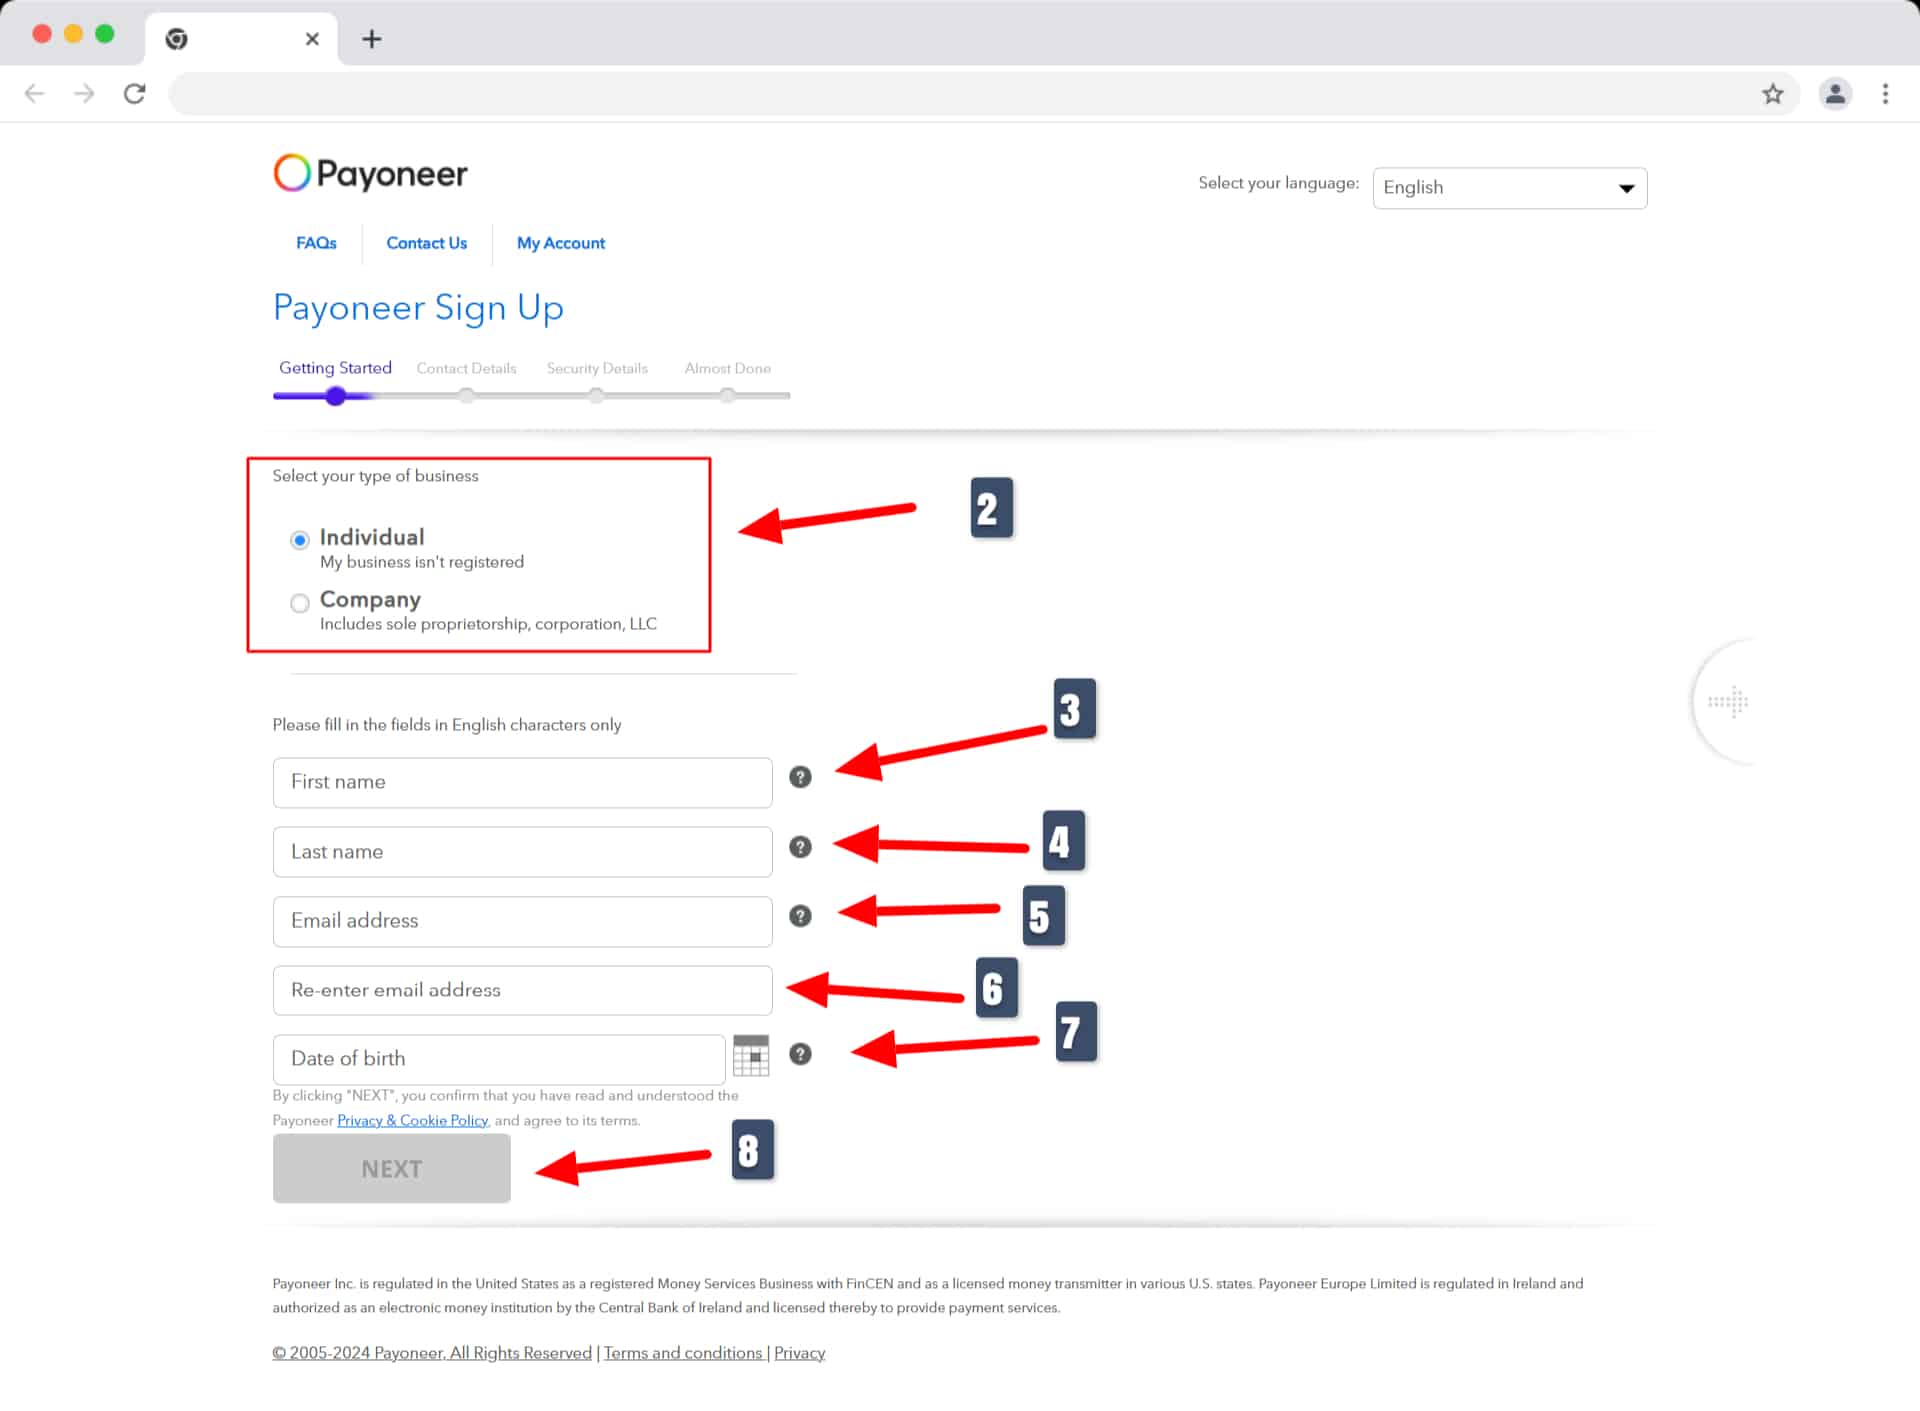
In the initial step of the process, you will be required to input your personal information. This includes providing your full name, email address, and date of birth. Ensure the accuracy of the details entered before proceeding to the next phase. Once you have filled in the required information, proceed by clicking on the ‘next’ button. This step is crucial as it establishes the foundation of your account, and accurate personal details are essential for the seamless functioning and security of your Payoneer account. Take a moment to double-check the information to guarantee a smooth progression to the subsequent steps in creating your Payoneer account.
STEP 2- CONTACT DETAILS

In this step, proceed by entering your contact details, which encompass essential information such as your country name, street address, city, and postal code. As you navigate through the contact details page, ensure accuracy in providing these particulars. Towards the conclusion of this section, select your country code and input your phone number. Subsequently, click on the “send code” button. This action triggers the transmission of a One-Time Password (OTP) to the mobile number you provided.
Upon receiving the OTP, promptly enter the code in the designated field. This serves as an additional layer of security to verify your identity. Once the code is successfully entered, you will gain the ability to advance to the next stage of the process by clicking on the “next” button. This multifaceted approach ensures the authenticity of your contact details and contributes to the overall security of your Payoneer account. Take a moment to review the accuracy of the entered information before proceeding, ensuring a smooth transition to the subsequent steps of creating your Payoneer account.
Establishing security details is a critical phase in the creation of your Payoneer account. In this step, you are required to set a robust password and select a security question, providing a corresponding answer. It is imperative to securely store this chosen security question and answer, as they may prove instrumental in various scenarios, such as password retrieval or account access from new locations. Safeguarding this information ensures a reliable means of account recovery and security verification.
STEP 3- SECURITY DETAILS
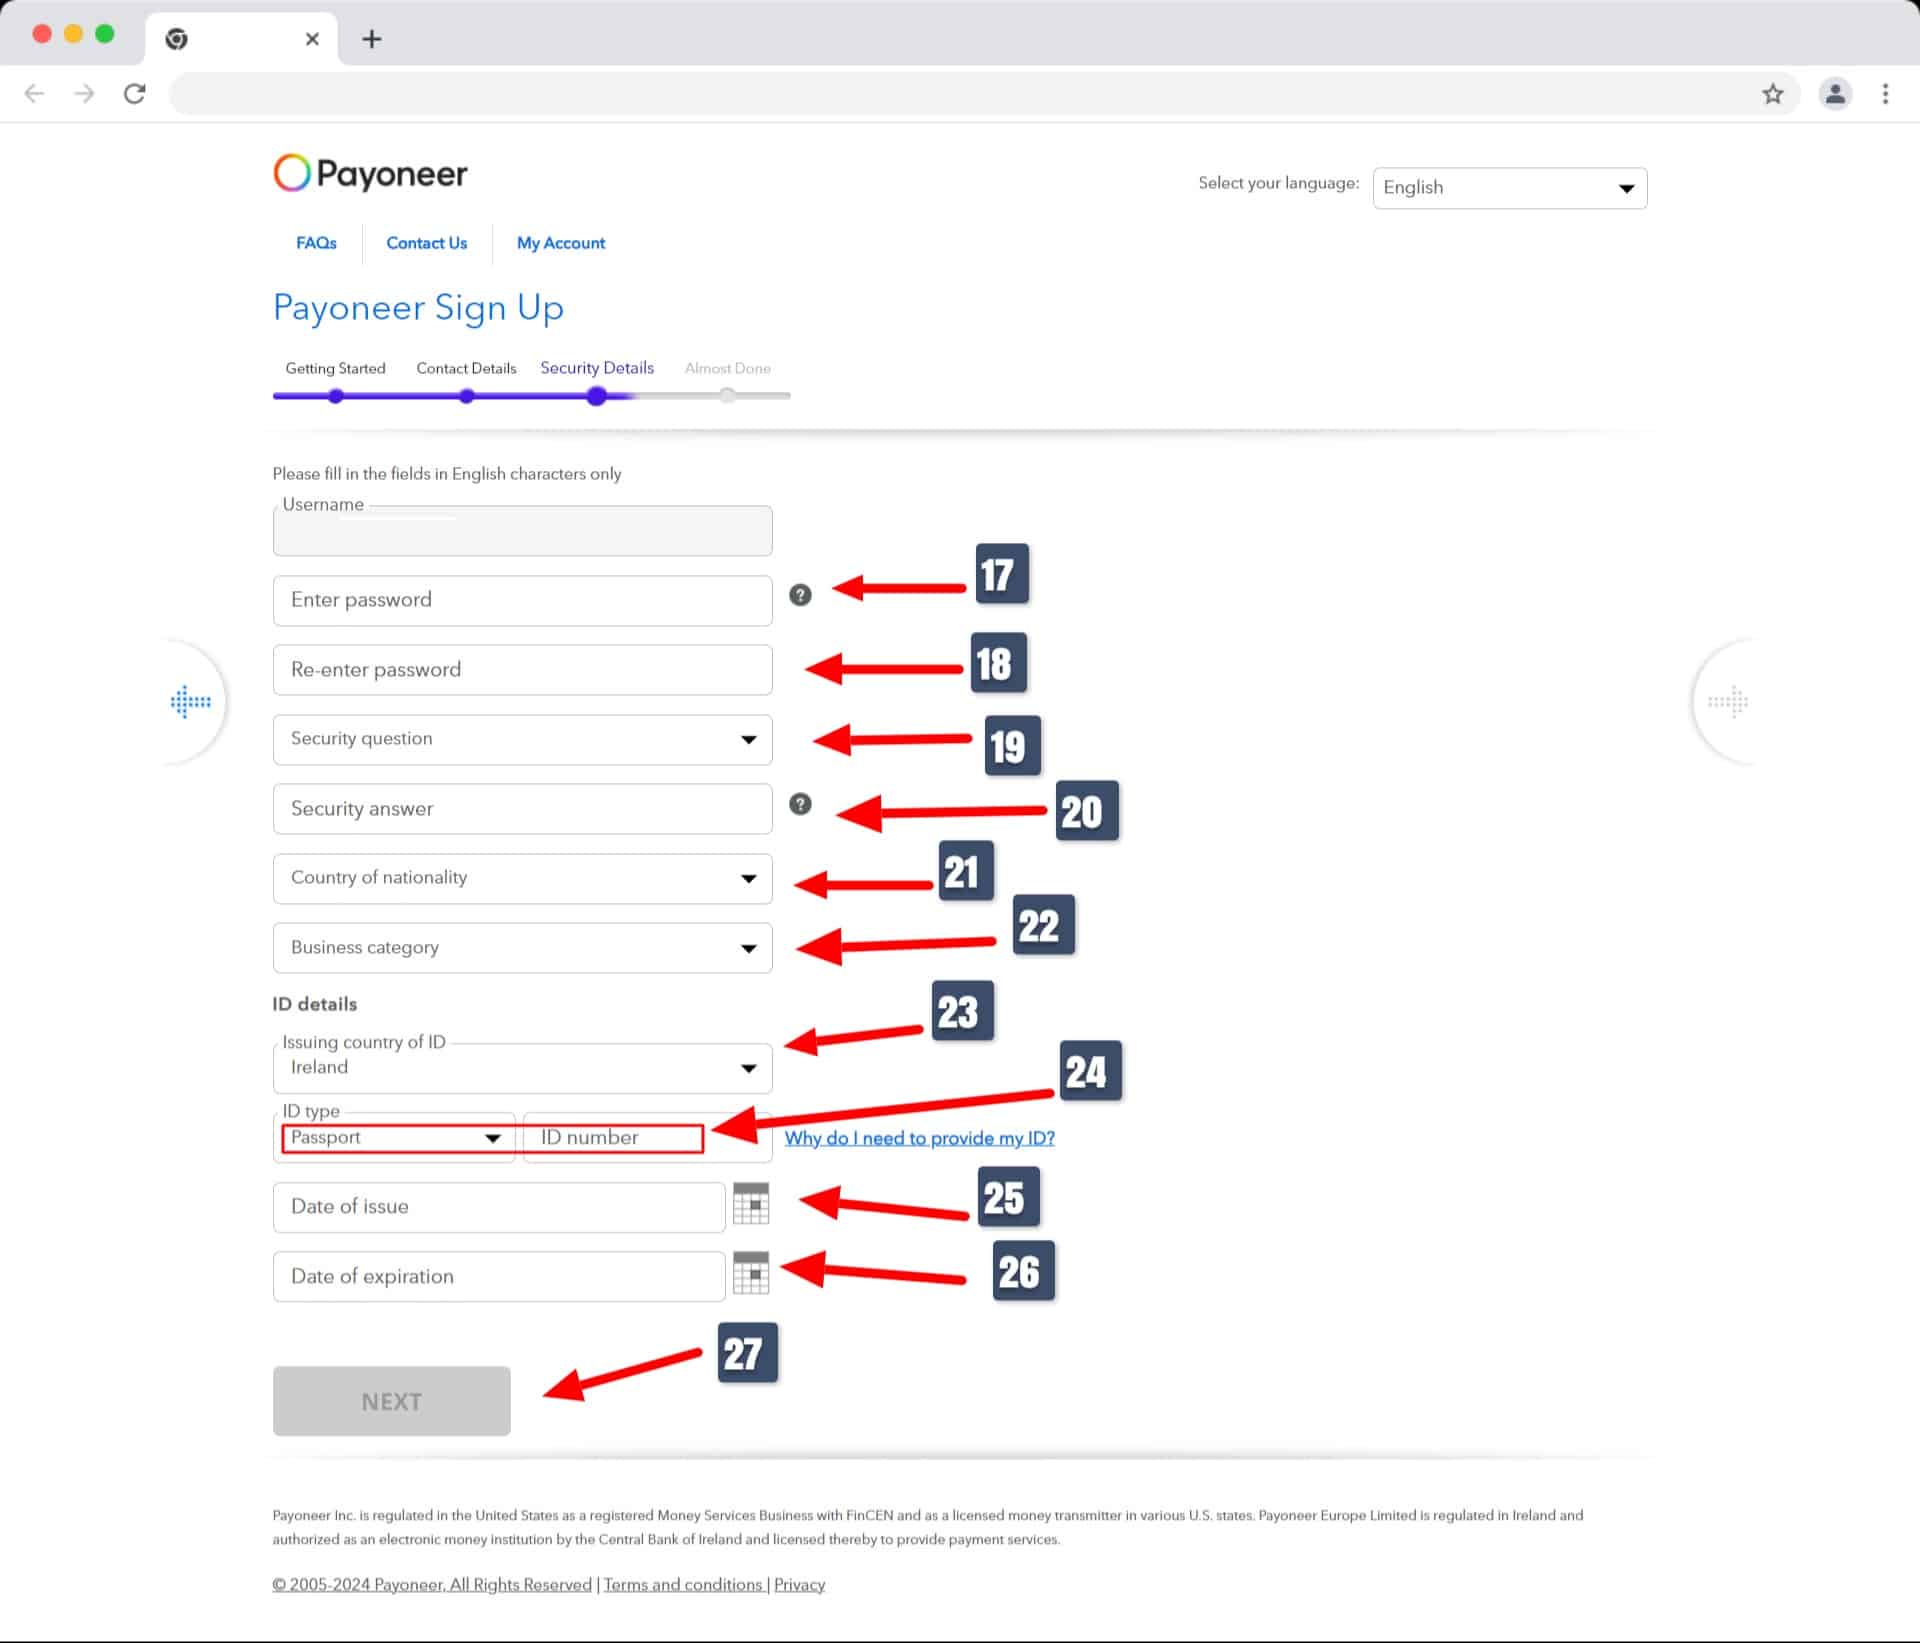
Subsequently, you will proceed to choose your country and input identification details, which may include your CNIC number, driving license number, or valid passport number. This step adds an extra layer of verification to enhance the security of your Payoneer account.
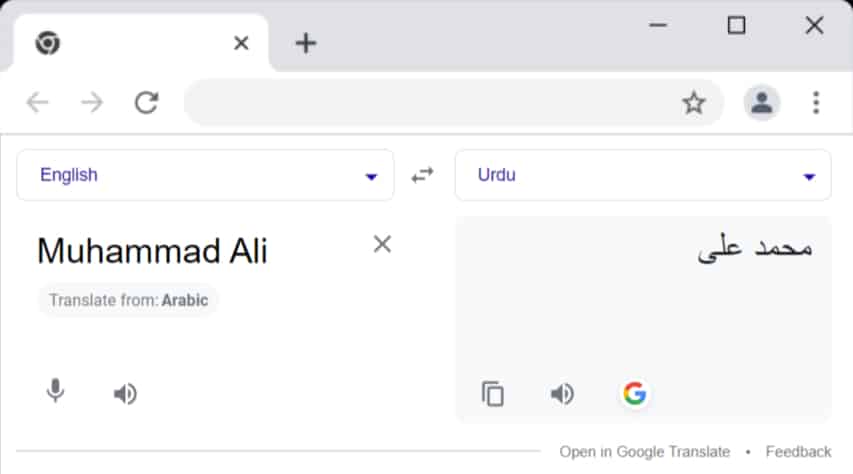
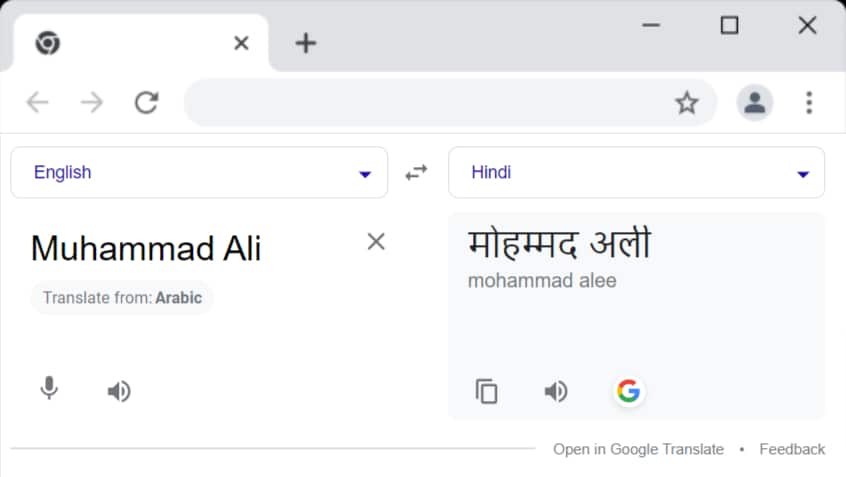
Towards the conclusion of the third step, you will be prompted to enter your name in your local language. For instance, if your name is “Muhammad Ali,” you should input your name in the local language as “محمد علی” This feature accommodates various linguistic preferences and ensures that your account details align with your preferred language.
As the third step draws to a close, you are prompted to input your name in your local language. Utilizing tools like Google Translator can facilitate this process, allowing you to accurately represent your name in languages such as Urdu, Hindi, or French, depending on your preference.
STEP 4- LOCAL BANK DETAILS
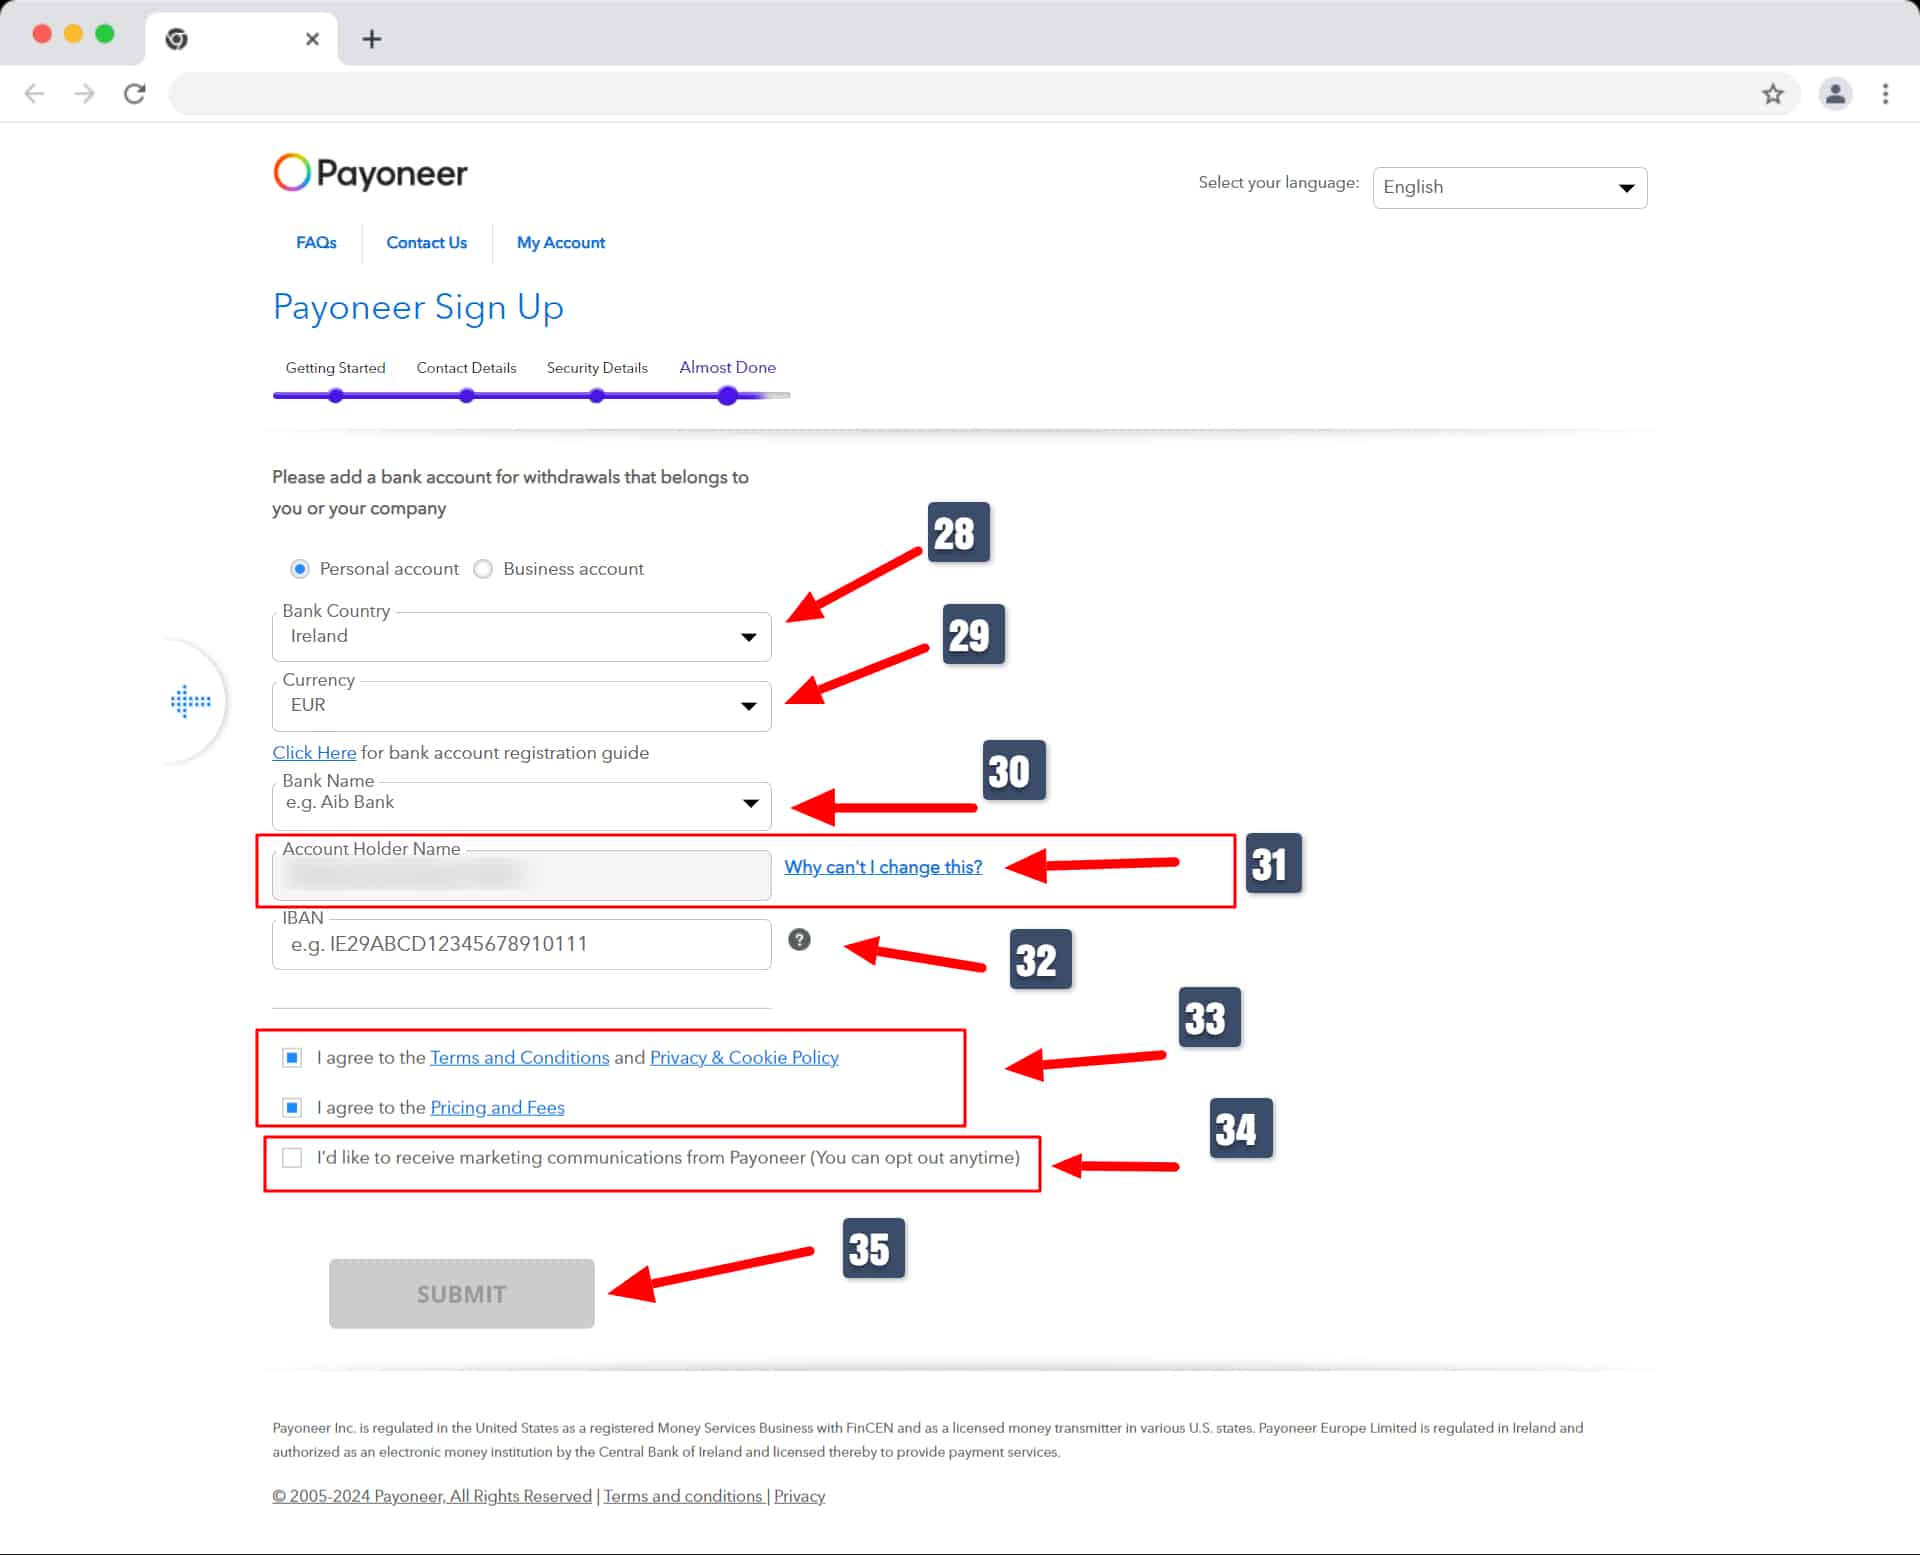
In this final step, you have to add your local bank details, select your county, and bank account currency, and select your bank name from the given bank list, “Account holder name will be auto-selected” and will be the same as your name, which you’ve added in the first step.
In the end, you have to enter your Bank IBAN number, If you have no idea about the IBAN, you can call your Bank helpline number or you can find it in your checkbook. After entering your IBAN number, you must have to checkmark the “Terms and Conditions, Privacy policy, and pricing & fees section.
Once you will put all the required information, you can safely click on the “submit” button. After submitting you have to wait 1 to 3 business days until your application will be reviewed by the Payoneer account approval team. Once your application is accepted, then you have to upload your cnic or driving license, you will get an email about this for verification purposes.
Conclusion
In conclusion, creating a Payoneer account and getting the $50 bonus reward as a new customer is a straightforward process that involves entering your personal information, providing contact details, setting up security details, and adding your local bank details. As an individual, entrepreneur, or freelancer, taking advantage of this opportunity can provide you with a reliable and convenient platform for managing your financial transactions.
By following the step-by-step guide outlined in this article, you can successfully create a Payoneer account in 2024 and position yourself to receive the $50 bonus reward upon completing your first $1000 from the marketplace. Don’t miss out on this opportunity to streamline your financial transactions and enjoy the benefits of using Payoneer for your business or freelance activities.


